> ## Documentation Index
> Fetch the complete documentation index at: https://mintlify-docs-automation-github-pr-review.mintlify.site/llms.txt
> Use this file to discover all available pages before exploring further.
# 无头文档与自定义前端
> 使用 Astro 构建无头文档前端,同时借助 Mintlify 进行内容管理、AI 搜索和助手功能。
Mintlify 的无头模式让你在使用 Mintlify 管理内容的同时,掌控文档的外观和行为。你无需使用 Mintlify 托管的前端,而是可以用 [Astro](https://astro.build) 构建自己的自定义前端,并按你想要的任何方式渲染 MDX 内容和 `docs.json` 配置。
当你需要完全掌控文档的设计、布局或行为,以匹配现有的设计系统或将文档嵌入到更大的网站中时,这种无头方式会非常有用,同时你仍然可以使用 Mintlify 的发布、搜索、MDX 组件和 AI 功能。
`@mintlify/astro` 集成会在构建时读取你的 `docs.json` 配置和 MDX 内容,然后将所有内容处理成 Astro 可渲染的格式。在此基础上构建你自己的布局、组件和样式。
本指南将带你完成使用入门模板设置无头 Mintlify 项目并在本地运行它的过程。
| Feature | Availability | Notes |
| ------------------------------------------- | ------------- | --------------------------------------------------------------------------------------------------------------------- |
| Mintlify components | Included | 在 MDX 文件中使用 ``、`` 和 `` 等组件,无需导入。 |
| Content processing | Included | `@mintlify/astro` 集成在构建时读取你的 `docs.json` 和 MDX 文件并进行处理。 |
| Search | Included | `SearchBar` 组件使用你的项目子域连接到 Mintlify 的搜索 API。 |
| AI assistant | Included | `Assistant` 组件提供一个由你的内容驱动的 AI 聊天界面。 |
| Layouts and styling | Custom build | 头部、底部、侧边栏、目录、页面模板和所有 CSS。入门模板包含使用 Tailwind CSS 构建的示例。 |
| Routing and navigation | Custom build | 一个 Astro catch-all 路由渲染每个页面。使用 `@mintlify/astro/helpers` 中的 `resolvePageData()` 和 `unwrapNav()` 从 `docs.json` 解析导航状态。 |
| Deployment and hosting | Custom build | 将你的 Astro 站点部署到任何托管服务商。 |
| SEO | You build | Meta 标签、Open Graph 标签、站点地图和 `robots.txt` 需要你自行生成。 |
| Third-party integrations | Custom build | 直接在你的 Astro 布局中添加集成。在 `docs.json` 中为托管项目配置的工具在无头模式下不适用。 |
| `llms.txt`, `llms-full.txt`, and `skill.md` | Custom build | 对于无头项目,你必须自行生成并提供这些文件。 |
| Dashboard analytics | Custom build | 如果你使用 `Assistant` 组件,助手使用分析数据可在控制台中查看。对于页面流量,请在你的 Astro 布局中添加你自己的分析提供商。 |
| Web editor | Not available | 需要 Mintlify 的托管渲染环境。 |
| Authentication and password protection | Not available | 仅适用于托管在 Mintlify 子域或指向 Mintlify 的自定义域名上的站点。 |
| API playground | Not available | 仅适用于托管在 Mintlify 平台上的站点。 |
| User feedback | Not available | 页面反馈功能是 Mintlify 托管渲染层的一部分。 |
| Preview deployments | Not available | 使用你的托管服务商的预览环境。 |
| PDF export | Not available | 无头项目不可用。 |
## 先决条件
* 拥有一个 [Mintlify 账号](https://dashboard.mintlify.com)
* 拥有一个 [GitHub 账号](https://github.com)
* 安装 [Node.js](https://nodejs.org) v20.17.0 或更高版本 (推荐使用 LTS 版本)
* 熟悉 [Astro](https://docs.astro.build)
## 设置项目
在 GitHub 上打开 [mintlify-astro-starter](https://github.com/mintlify/mintlify-astro-starter) 存储库,并点击 **Use this template**,在你的账户下创建一个新的存储库。
将该存储库克隆到本地环境。
如果你还没有 Mintlify 账户,请前往 [dashboard.mintlify.com/signup](https://dashboard.mintlify.com/signup) 注册。
在 Mintlify 控制台的 [Git settings](https://dashboard.mintlify.com/settings/deployment/git-settings) 页面中,安装 [Mintlify GitHub 应用](/zh/deploy/github)。如果你已经安装了该应用,请先卸载再重新安装,以便为连接新存储库做好准备。
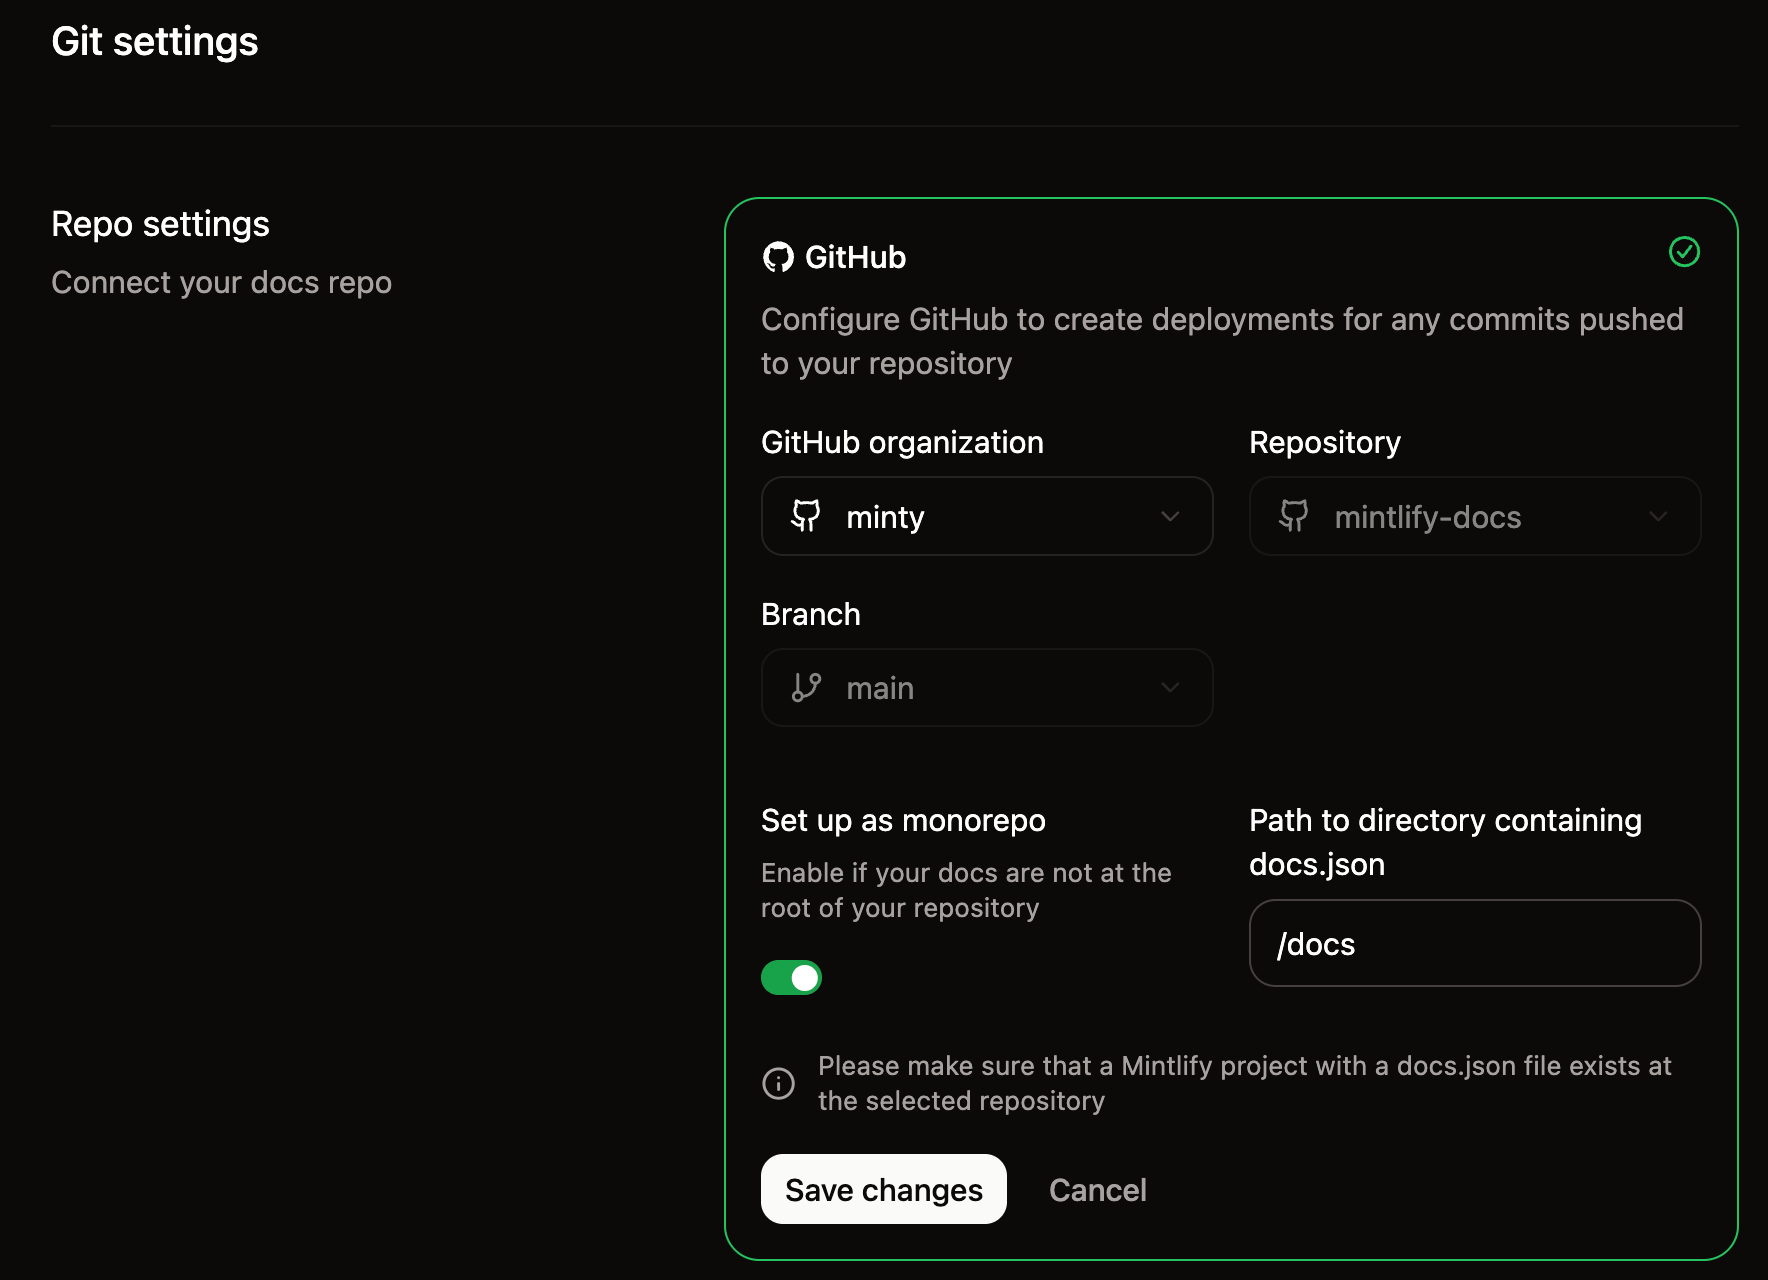
1. 在 [Git settings](https://dashboard.mintlify.com/settings/deployment/git-settings) 页面中,选择你通过 starter 模板创建的存储库。
2. 启用 **Set up as monorepo** 开关。
3. 将 `/docs` 填写为包含 `docs.json` 文件的目录路径。
4. 点击 **保存更改**。

 将你的新存储库克隆到本地后,在项目根目录创建一个 `.env` 文件,并填入你的 Mintlify 凭据:
```bash .env theme={null}
PUBLIC_MINTLIFY_SUBDOMAIN=your-subdomain
PUBLIC_MINTLIFY_ASSISTANT_KEY=your-assistant-api-key
```
你的子域 (subdomain) 是项目的域名部分,即在控制台 URL 中组织名称之后的那一段。比如,如果你的控制台 URL 是 `https://dashboard.mintlify.com/org-name/domain-name`,那么你的子域就是 `domain-name`。
在控制台的 [API keys](https://dashboard.mintlify.com/settings/organization/api-keys) 页面生成一个 AI 助手 API key。该 API key 以 `mint_dsc_` 开头。
在你克隆的存储库中安装依赖并启动本地开发服务器:
```bash theme={null}
cd path/to/your-repository
npm install
npm run dev
```
你的站点现在将在本地的 `http://localhost:4321` 上运行。
将你的新存储库克隆到本地后,在项目根目录创建一个 `.env` 文件,并填入你的 Mintlify 凭据:
```bash .env theme={null}
PUBLIC_MINTLIFY_SUBDOMAIN=your-subdomain
PUBLIC_MINTLIFY_ASSISTANT_KEY=your-assistant-api-key
```
你的子域 (subdomain) 是项目的域名部分,即在控制台 URL 中组织名称之后的那一段。比如,如果你的控制台 URL 是 `https://dashboard.mintlify.com/org-name/domain-name`,那么你的子域就是 `domain-name`。
在控制台的 [API keys](https://dashboard.mintlify.com/settings/organization/api-keys) 页面生成一个 AI 助手 API key。该 API key 以 `mint_dsc_` 开头。
在你克隆的存储库中安装依赖并启动本地开发服务器:
```bash theme={null}
cd path/to/your-repository
npm install
npm run dev
```
你的站点现在将在本地的 `http://localhost:4321` 上运行。
## 工作原理
该集成连接了三个部分:Astro 构建系统、`docs/` 目录中的内容,以及用于处理并渲染这些内容的 Mintlify 包。
### Astro 配置
在 `astro.config.mjs` 中配置 `mintlify()` 集成,并指定文档目录的路径:
```javascript astro.config.mjs theme={null}
import { defineConfig } from 'astro/config';
import react from '@astrojs/react';
import mdx from '@astrojs/mdx';
import { mintlify } from '@mintlify/astro';
export default defineConfig({
integrations: [mintlify({ docsDir: './docs' }), react(), mdx()],
});
```
在构建时,该集成会从 `docsDir` 路径读取你的 `docs.json` 和 MDX 文件,将它们处理为 `.mintlify/docs/` 中的内容,供 Astro 的内容集合使用。
### 内容结构
你的文档内容存放在 `docs/` 目录中,其结构与其他 Mintlify 项目相同:
```text theme={null}
docs/
├── docs.json # 导航和站点配置
├── index.mdx # 用于内容的 MDX 页面
├── quickstart.mdx
└── guides/ # 用于组织页面的目录
├── setup.mdx
└── troubleshooting.mdx
```
MDX 文件使用标准 Mintlify [frontmatter](/zh/organize/pages#page-metadata),并且可以在无需导入它们的情况下使用 Mintlify 组件。
### 路由与导航
使用一个 catch-all 路由来渲染每个 MDX 页面。`@mintlify/astro/helpers` 包提供了一些函数,用于从你的 `docs.json` 中解析导航状态。
* `resolvePageData()`:为指定的页面路径返回标签页 (tabs) 、侧边栏导航、页脚链接和页内锚点。
* `unwrapNav()`:将导航树扁平化为列表,以便用于侧边栏渲染。
### 布局和样式
你可以完全掌控呈现层。起始模板包含布局、侧边栏、目录以及使用 Tailwind CSS 构建的样式,但你可以将其中任何部分替换为你自己的实现。
需要自定义的关键文件:
| File | Purpose |
| ------------------------------------ | ------------ |
| `src/layouts/Layout.astro` | 根 HTML 布局 |
| `src/pages/[...slug].astro` | 页面模板和数据加载 |
| `src/components/Header.astro` | 站点头部 |
| `src/components/Sidebar/` | 侧边栏导航 |
| `src/components/TableOfContents.tsx` | 页面内目录 |
| `src/styles/` | 全局样式、排版和配色方案 |
## 连接搜索和 AI 助手
入门模板包含搜索和 AI 助手组件,它们通过你在设置过程中配置的环境变量连接到 Mintlify 的 API。
* **Search (搜索) **:`src/components/SearchBar.tsx` 中的 `SearchBar` 组件会请求 Mintlify 搜索 API。
* **Assistant (AI 助手) **:`src/components/Assistant/` 中的 `Assistant` 组件提供一个 AI 聊天界面,使用你的文档内容回答问题。
这两者都需要 `PUBLIC_MINTLIFY_SUBDOMAIN` 和 `PUBLIC_MINTLIFY_ASSISTANT_KEY` 这两个环境变量。
## 后续步骤
完成项目设置后:
1. 将 `docs/` 目录中的示例内容替换为你自己的 MDX 文件和 `docs.json` 配置。
2. 自定义布局和样式,使其符合你的设计系统。
3. 将你的 Astro 站点部署到你首选的托管服务商。